Statements
- Statements
- If Statement
@if(x == 1) - Variable Declaration
{{ x = 5 }} - Use Statement
@use("layouts/main") - Insert Statement
@insert("title", "Home") - Reserve Statement
@reserve("title") - For Loop
@for(i = 0; i < 2; i++) - Each Loop
@each(name in names) - Component
@component("components/post-card") - Component Slots
@slot('footer') - Dump Directive
@dump(users, page)
- If Statement
If Statement
You can use if statements to conditionally render content. You can construct @if statement using the @if, @elseif, @else and @end directives.
Here is an example of using if statements:
@if(name == "Anna")
    <p>Her name is Anna</p>
@end
You can also use else and elseif statements:
@if(x == 1)
    <p>x is 1</p>
@elseif(x == 2)
    <p>x is 2</p>
@else
    <p>x is not 1 and 2</p>
@end
If you pass nil or an empty string to the @if statement, it will be treated as false.
{{ name = nil }}

@if(name)
    <p>This will not be printed</p>
@end
For Loop
You can use regular for loops to iterate over an array or a range of numbers.
This is a basic for loop that you can use. It has a declaration, condition and post statement. for <declaration>; <condition>; <post>. They are all optional. Here is an example of using for loop:
{{ names = ["Ann", "Serhii"] }}

@for(i = 0; i < names.len(); i++)
    <p>{{ names[i] }}</p>
@else
    <p>No names</p>
@end
Read more about loops in the Loops guide.
Example
{{ names = ["Ann", "Serhii", "Vladimir"] }}

<ul>
    @for(i = 0; i < names.len(); i++)
        @continueIf(names[i] == "Serhii")
        <li>{{ names[i] }}</li>
    @end
</ul>
Each Loop
Each statement is a special for loop that you can use to iterate over an array. It has a declaration and an array. @each(<declaration> in <array>). Here is an example of using each loop:
{{ names = ["Ann", "Serhii"] }}

@each(name in names)
    <p>{{ name }}</p>
@end
Read more about loops in the Loops guide.
Variable Declaration
You can assign and declare variables by using the = operator. Here is an example of declaring variables:
{{ x = 5 }}
{{ x = 10 }}
You cannot assign values to variables that have a different type. For example, you cannot do {{ x = "Hello"; x = 3 }} because x is a string and then you are trying to assign an integer to it. In Textwire, you don't need to declare type of a variable, it will be automatically inferred from the value that you assign to it.
Variable declaration statements are not expressions! They don't return any value and can't be used inside of other expressions. Therefore, they don't print anything to the output.
Use Statement
@use statements allow you to specify a layout file that will be used to render the current template. This feature is useful for creating reusable layouts that can be applied to multiple templates.
Here is an example of using use statement:
@use("layouts/main")
Or, you can use a path alias like this:
@use("~main")
If your layouts are located in the layouts directory, you can use the ~ alias to reference them. For example, @use("~main") instead of @use("layouts/main"). Behind the scenes, the ~ alias will be replaced with layouts/.
The @use statement accepts a string literal as its argument. This string literal should specify the path to the layout file relative to the TemplateDir parameter defined in the configuration. For example, if TemplateDir is set to "src/templates" and you have layouts directory in there, you can use the layout statement like @use("layouts/main"), and it will look for the layout file at "src/templates/layouts/main.tw".
When you use the @use directive, only the content inside @insert directives will be rendered; the rest of the file's content will be ignored. This is because the @use directive applies a layout file instead of rendering the current file directly. During this process, all placeholders reserved in the layout file are populated with the content specified within your @insert directives.
Insert Statement
The @insert statement lets you inject content into placeholders defined by the @reserve statement in your layout file. This feature enables flexible template structuring and reusability.
Below is an example demonstrating two scenarios for the @insert statement with a content body and without:
@use("layouts/main")

<!-- Without a content body -->
@insert("title", "Home page")

<!-- With a content body -->
@insert("content")
    <h1>Hello, World!</h1>
    <p>This is a home page.</p>
@end
The @insert statement is optional and accepts two arguments: the name of the reserved placeholder and the optional content to be injected into that placeholder.
All @insert statements are evaluated within the layout file, where they are matched to placeholders defined by the @reserve statement.
- Defining an
@insertfor a placeholder that is not declared in the layout file using@reservewill result in an error. - You cannot define multiple
@insertstatements with the same name in a single file.
Reserve Statement
When defining a layout file for your template, you can reserve placeholders for dynamic content. These placeholders can be used for elements such as the title, content, sidebar, footer, and more. Below is an example of how to use the @reserve statement:
<!DOCTYPE html>
<html lang="en">
<head>
    <meta charset="UTF-8">
    <meta name="viewport" content="width=device-width, initial-scale=1.0">
    <title>@reserve("title")</title>
</head>
<body>
    @reserve("content")
</body>
</html>
All variables passed to the template file are also available in the layout file. This means you can replace @reserve("title") with {{ title }} and define the title variable in each template file. In other words, variables available in the template file can be seamlessly used within the layout file.
The @reserve statement accepts a single argument: the name of the reserved placeholder. This name will be used in the @insert statement to insert content into the corresponding placeholder.
Component
The @component directive allows you to include reusable components within your templates. Components help organize and structure templates by encapsulating reusable parts of your UI.
To use components in Textwire, create a components directory inside your templates and store your component files there. You can then include a component in your template using the @component directive.
Here’s a simple example of using a component:
Example of a Component
<div class="post">
    <h1>{{ post.title }}</h1>
    <p>{{ post.content }}</p>
</div>
Example of Using a Template
<div class="posts">
    @each(post in posts)
        @component("components/post-card", { post })
    @end
</div>
Component cannot have empty body and be like @component("components/post-card", { post })@end. In this situations it's important to remove @end token.
If your components are located in the components directory, you can use the ~ alias to reference them. For example, @component("~post-card", { post }) instead of @component("components/post-card", { post }). Behind the scenes, the ~ alias will be replaced with components/.
The first argument of the @component directive is a path to the component file relative to the TemplateDir parameter that you set in the config.
The second optional argument is a Textwire object that you want to pass to the component. Here is another example of using a component with a second argument:
<ul>
    @each(book in books)
        @component("parts/book", { completed: book.completed })
    @end
</ul>
You can also use slots in components to pass content to the component. Read about slots in the next section.
Component Slots
Component slots are a common feature in many template languages and frameworks. Textwire supports both named and default slots, allowing you to pass content into components flexibly.
There are two types of slots in Textwire: default slots and named slots.
- Default Slots: Use the
@slotdirective to define and pass content to a default slot. - Named Slots: Use the
@slot("slot-name")directive to define and pass content to a named slot.
Here’s an example of how to use slots in a component. Consider this component:
<div class="book">
    @slot

    <h1>{{ book.title }}</h1>
    <p>{{ book.description }}</p>

    @slot('footer')
</div>
We can now use book.tw component in our Textwire files like this:
@each(book in books)
    @component("~book", { book })
        @slot
            <img src="{{ book.image }}" alt="{{ book.title }}">
        @end

        @slot('footer')
            <small>published by {{ book.author }}</small>
            <button>Read more</button>
        @end
    @end
@end
In this example, both default and named slots are used within a single component. You can include as many slots as needed in a single component, provided that all named slots have unique names.
Defining multiple slots with the same name, or defining 2 default slots in a single component will result in an error.
Dump Directive
The @dump directive will feel familiar to Laravel and Symfony users. It is primarily used for debugging purposes. This directive outputs the value of variables, objects, arrays, strings and other data types to the screen.
Here’s an example of how to use the @dump directive:
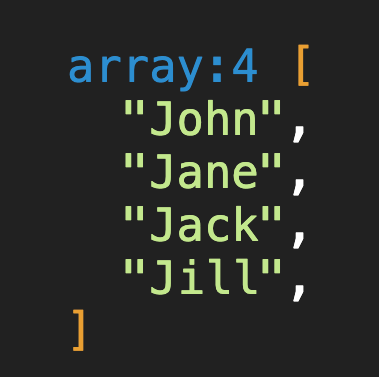
{{ names = ["John", "Jane", "Jack", "Jill"] }}

@dump(names)
The output would look like something like this:

Works with Different Types
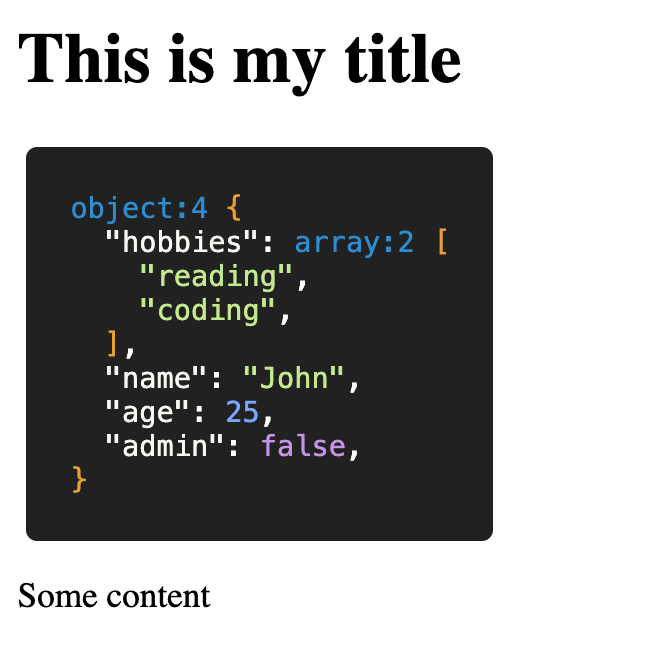
Similarly, you can print objects and other types of data:
<h1>This is my title</h1>

@dump({
    name: "John",
    age: 25,
    admin: false,
    hobbies: ["reading", "coding"],
})

<p>Some content</p>

Dump Multiple Objects
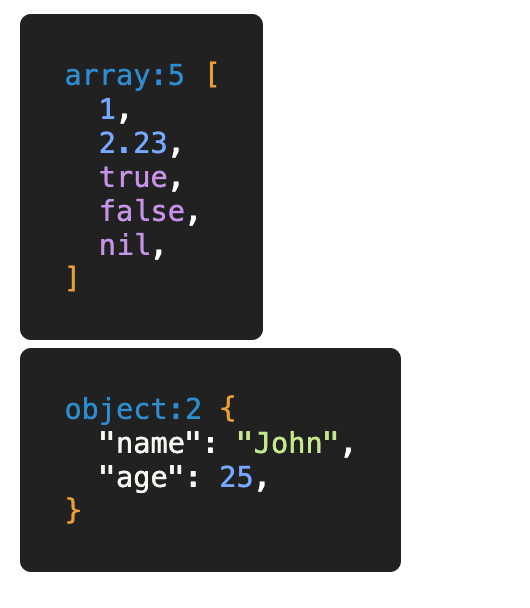
@dump directive can accept an endless amount arguments at once:
{{ meta = [1, 2.23, true, false, nil] }}
{{ user = { name: "John", age: 25 } }}

@dump(meta, user)

It's an easy and convenient way to debug your templates and see what's going on inside of them.